Git与Github
在Linux的Ubuntu发行版上一般都会默认安装了Git,所以不需要自己手动安装,拿来即用即可。
1
2
git config --global user.name "SSH keys Name"
1 ssh-keygen -t rsa -C "Email of Github Account"
1
2
3
4
5
6
7
8
9
10
(base) houjinliang@3080server:~/userdoc/d2cv$ git config --global user.name 'hjl_3080server' 'cosmicdustycn@outlook.com' "cosmicdustycn@outlook.com" in which to save the key (/mnt/houjinliang/.ssh/id_rsa): '/mnt/houjinliang/.ssh' .for no passphrase): in /mnt/houjinliang/.ssh/id_rsa.in /mnt/houjinliang/.ssh/id_rsa.pub.
不需要担心Git的用户配置会对本服务器上的其他用户会产生影响。ssh-keygen生产的的用户密钥会保存在个人账号的目录下。
1
2
3
4
5
6
7
8
9
(dlpy310pth113) houjinliang@3080server:~/.ssh$ pwd
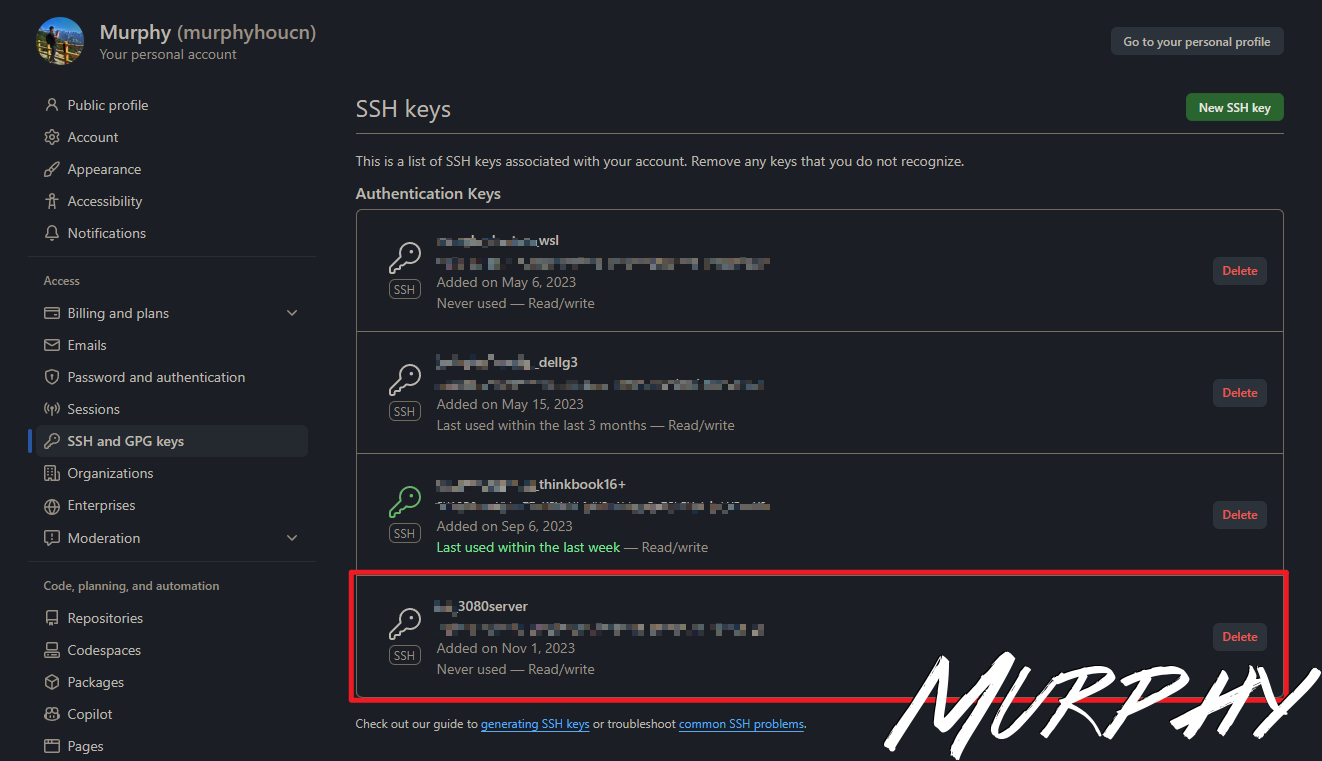
复制id_rsa.pub文件下的内容,到Github的Setting中设置SSH Keys。如下。
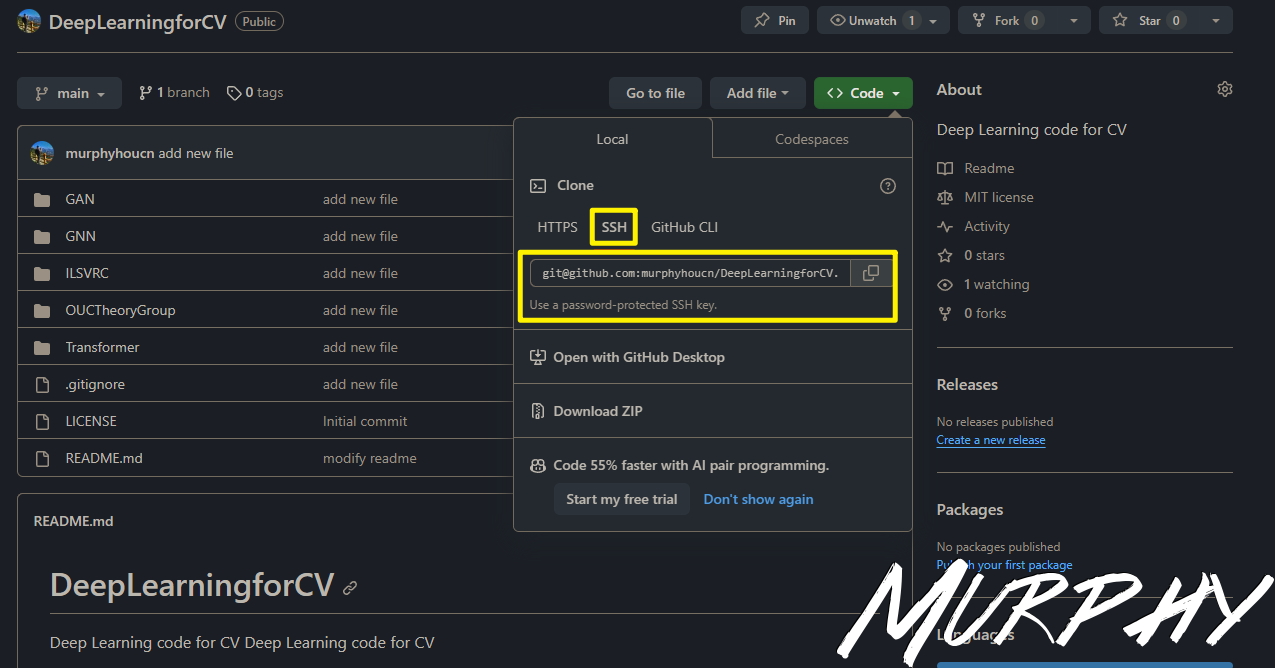
1
2
3
4
5
(base) houjinliang@3080server:~/userdoc$ git clone git@github.com:murphyhoucn/DeepLearningforCV.git"add new file"
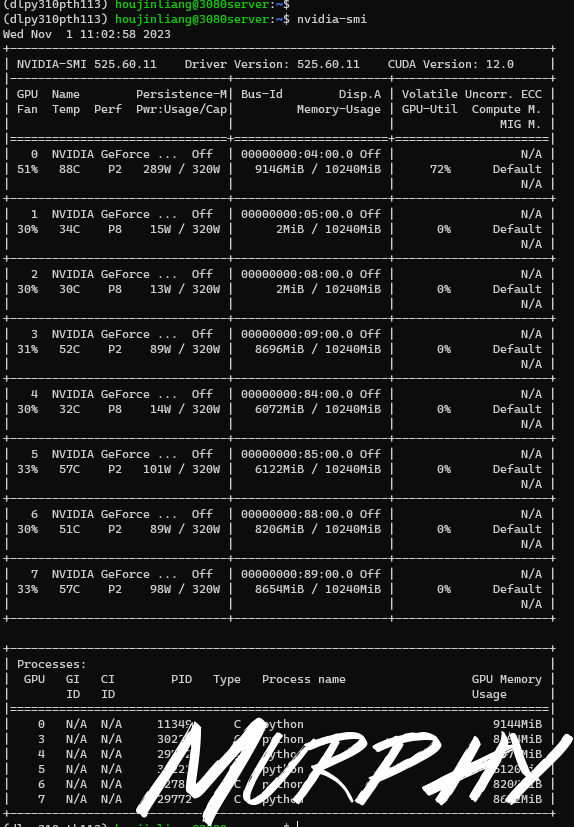
查看GPU占用情况 nvidia-smi
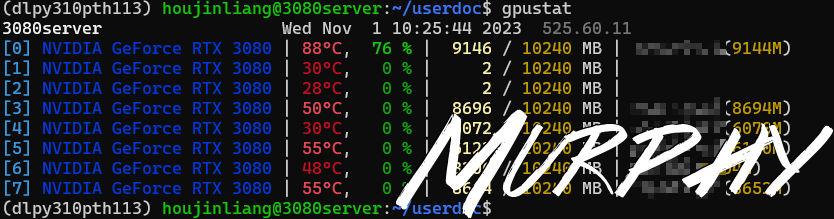
gpustat
GitHub - wookayin/gpustat: 📊 A simple command-line utility for querying and monitoring GPU status
1
2
(dlpy310pth113) houjinliang@3080server:~/userdoc$ pip install gpustat
nvitop
GitHub - XuehaiPan/nvitop: An interactive NVIDIA-GPU process viewer and beyond, the one-stop solution for GPU process management.
nvitop: 史上最强GPU性能实时监测工具 - 知乎 (zhihu.com)
1
2
3
4
5
6
(dlpy310pth113) houjinliang@3080server:~$ pip install nvitopin ./miniconda3/envs/dlpy310pth113/lib/python3.10/site-packages (1.3.0)in ./miniconda3/envs/dlpy310pth113/lib/python3.10/site-packages (from nvitop) (12.535.108)in ./miniconda3/envs/dlpy310pth113/lib/python3.10/site-packages (from nvitop) (5.9.5)in ./miniconda3/envs/dlpy310pth113/lib/python3.10/site-packages (from nvitop) (5.3.1)in ./miniconda3/envs/dlpy310pth113/lib/python3.10/site-packages (from nvitop) (2.3.0)
Clash for Linux
Ubuntu配置 命令行Clash 教程 - 知乎 (zhihu.com)
终端使用代理加速的正确方式(Clash) | Ln’s Blog (weilining.github.io)
2024.01.10
1
2
3
4
gunzip clash-linux-amd64-v1.18.0.gzmv clash-linux-amd64-v1.18.0 clashchmod u+x clash
1 在 ~/.config/clash/config.yaml 写入订阅的内容
1 2 3 4 5 6 7 8 9 10 11 `~/.bashrc`function proxy export http_proxy=http://127.0.0.1:7890export https_proxy=$http_proxy echo -e "proxy on!" function unproxy unset http_proxy https_proxyecho -e "proxy off"
1
2
3
4
5
(base) houjinliang@3080server:~/userdoc$ source ~/.bashrc
1
2
3
4
5
6
7
8
9
10
11
12
13
14
15
16
17
18
19
20
21
22
23
24
25
26
27
28
29
(base) houjinliang@3080server:~/userdoc$ wget www.zhihu.com
MMDetection
版本选择参考镜像:
open-mmlab/mmdetection3d/mmdetection3d-1.1: mmdetection3d-1.1版本 - CG (codewithgpu.com)
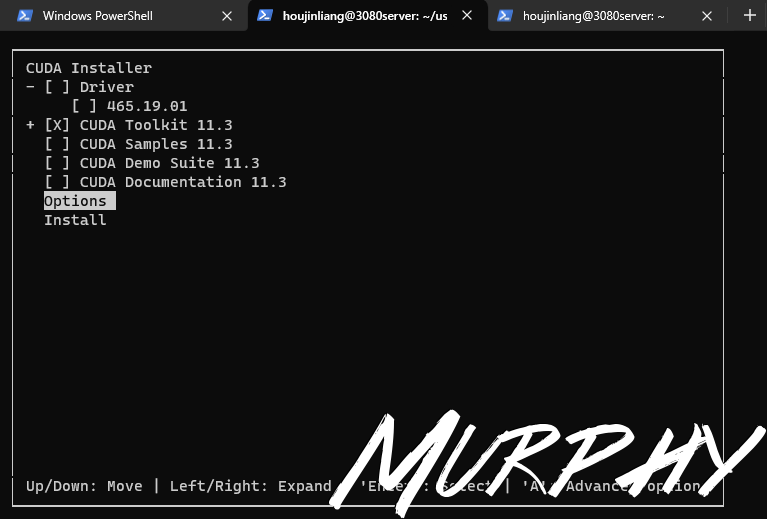
CUDA 11.3.1 & CUDNN 8.9.5 之前安装的是CUDA 11.6,后面感觉这个版本有点儿高了,在看到一些实例之后,决定退回到CUDA 11.3版本。首先第一步是要卸载掉CUDA 11.6,在搜索了之后,发现并没有找到能用的方法,于是决定直接rm -rf cuda-11.6,这样吧CUDA的文件删掉之后再重装。
CUDA Toolkit 11.3 Update 1 Downloads | NVIDIA Developer
1
2
wget https://developer.download.nvidia.com/compute/cuda/11.3.1/local_installers/cuda_11.3.1_465.19.01_linux.run
非root用户安装cuda与cudnn - 知乎 (zhihu.com)
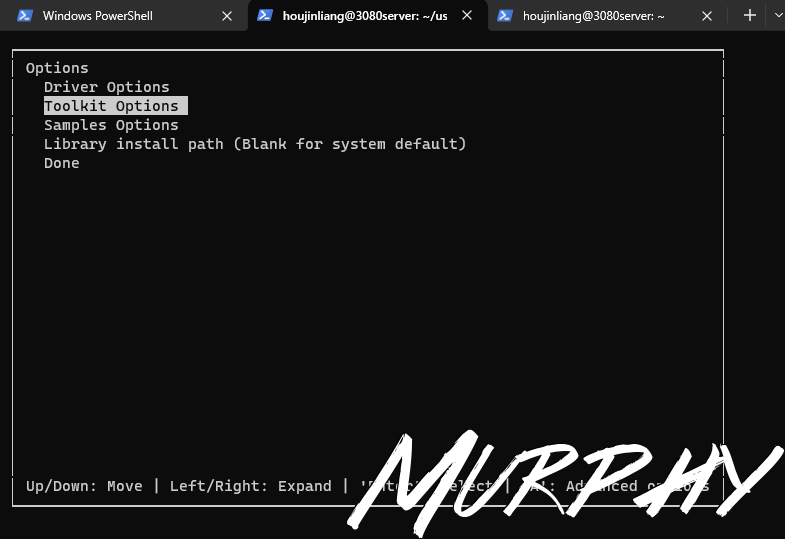
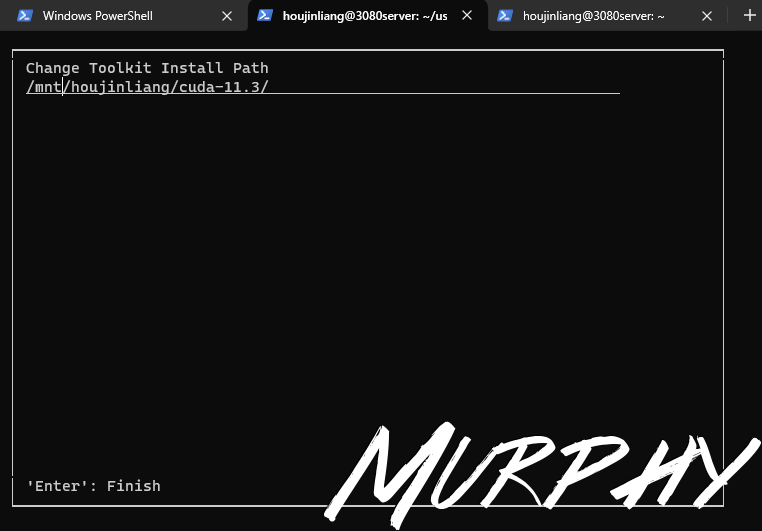
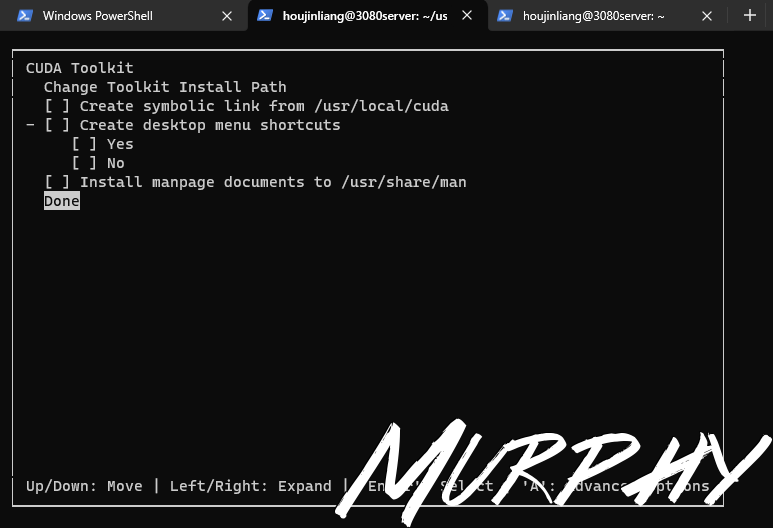
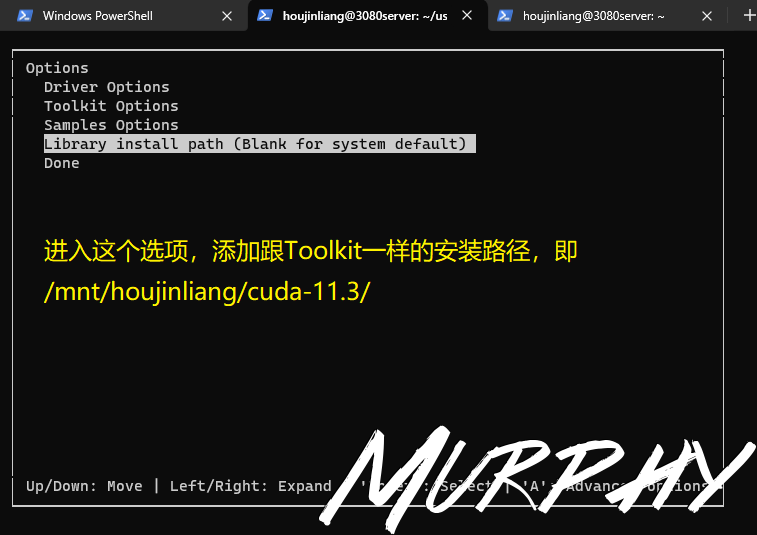
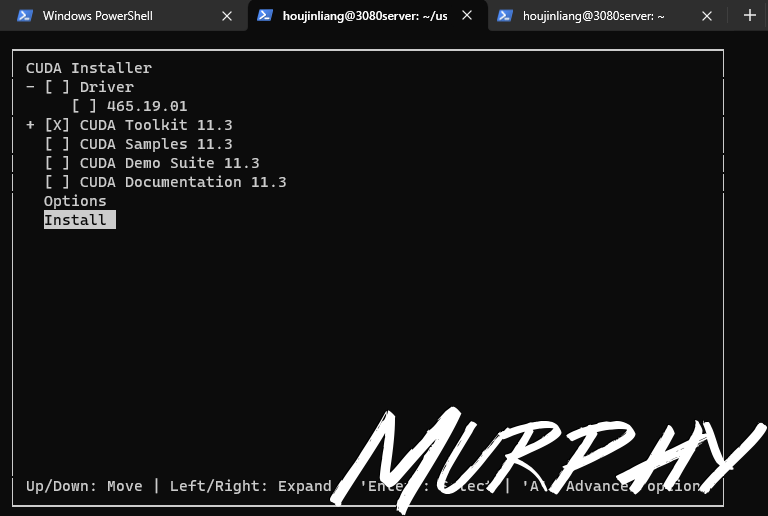
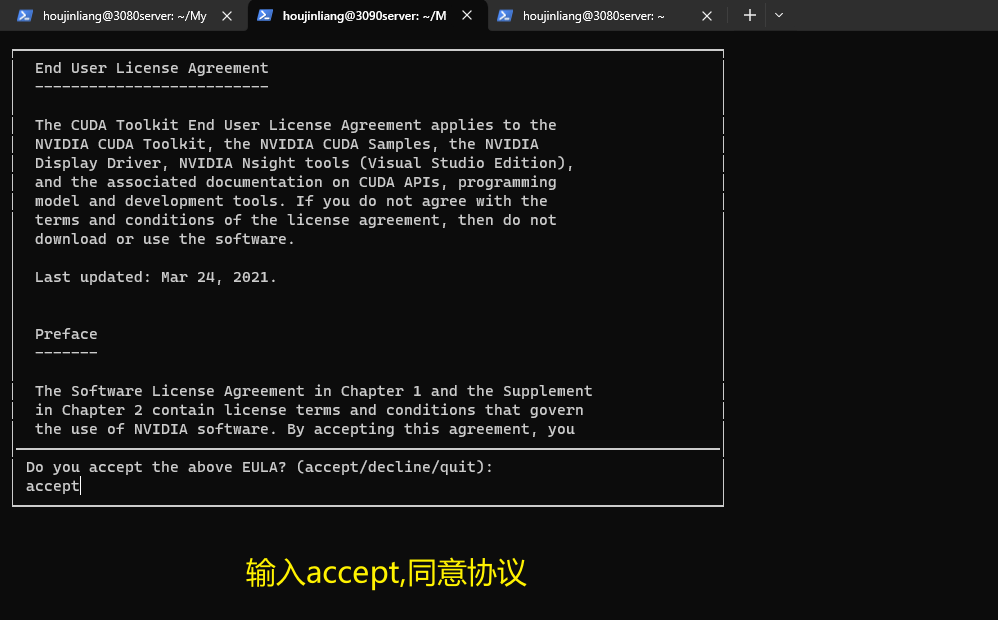
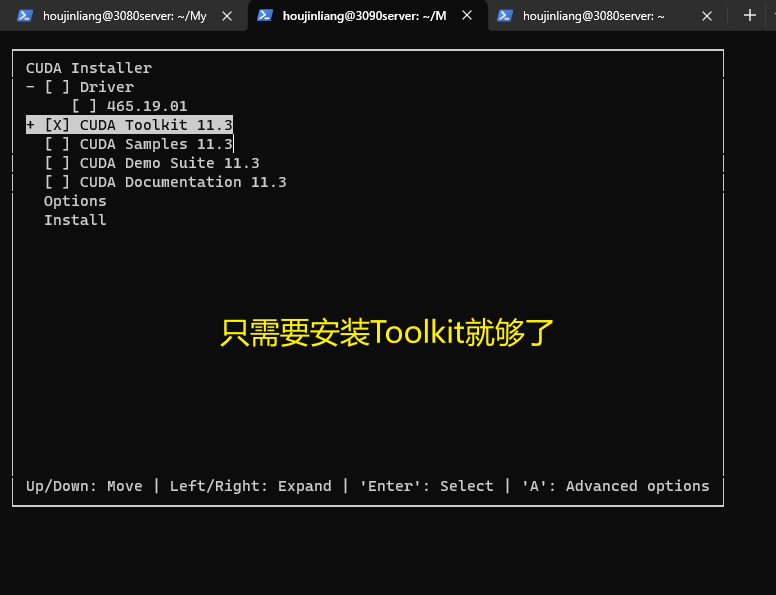
1
2
3
4
5
6
7
8
9
(base) houjinliang@3080server:~/userdoc/cuda_and_cudnn$ sh ./cuda_11.3.1_465.19.01_linux.runin /mnt/houjinliang/cuda-11.3/ Samples: Not Selectedin /mnt/houjinliang/cuda-11.3/bin ***WARNING: Incomplete installation! This installation did not install the CUDA Driver. A driver of version at least 465.00 is required for CUDA 11.3 functionality to work. To install the driver using this installer, run the following command , replacing <CudaInstaller> with the name of this run file: sudo <CudaInstaller>.run --silent --driver
1
2
3
4
5
6
7
8
9
vim ~/.bashrcexport CUDA_HOME=$CUDA_HOME :/mnt/houjinliang/cuda-11.3export PATH=$PATH :/mnt/houjinliang/cuda-11.3/binexport LD_LIBRARY_PATH=$LD_LIBRARY_PATH :/mnt/houjinliang/cuda-11.3/lib64
1
2
3
4
5
6
7
8
(base) houjinliang@3080server:~$ source ~/.bashrc
1
2
3
4
5
6
7
8
9
10
11
12
13
14
15
16
17
18
19
20
21
22
23
24
25
26
(base) houjinliang@3080server:~/userdoc/cuda_and_cudnn$ tar xvJf cudnn-linux-x86_64-8.9.5.29_cuda11-archive.tar.xzcp lib/* ~/cuda-11.3/lib64/cp include/* ~/cuda-11.3/includechmod +x ~/cuda-11.3/include/cudnn.hchmod +x ~/cuda-11.3/lib64/libcudnn*cat ~/cuda-11.3/include/cudnn_version.h | grep CUDNN_MAJOR -A 2
PyTorch 1.11 1 2 3 4 5 6 7 8 9 10 11 (base) houjinliang@3080server:~$ conda create -n py38mmdetection python=3.8 -y"help" , "copyright" , "credits" or "license" for more information.print (torch.cuda.is_available())
阿里云源 1 pip config set global.index-url https://mirrors.aliyun.com/pypi/simple
mmdet installation 开始你的第一步 — MMDetection 3.3.0 文档
MMYOLO Overview — MMYOLO 0.6.0 documentation
1
2
3
4
5
6
7
8
9
10
11
(base) houjinliang@3080server:~$ conda create -n py38mmyolo python=3.8'https://mirrors.aliyun.com/pypi/simple' "import torch; print(torch.__version__); print(torch.cuda.is_available())"
1 2 3 4 pip install -U openmim"mmengine>=0.6.0" "mmcv>=2.0.0rc4,<2.1.0" "mmdet>=3.0.0,<4.0.0"
1 2 3 4 5 6 7 8 9 git clone https://github.com/open-mmlab/mmyolo.gitcd mmyolo
1 2 3 4 5 6 7 8 9 10 (base) houjinliang@3080server:~/userdoc/offlinefile$ wget http://images.cocodataset.org/zips/val2017.zip
目录占用空间大小查询
1 2 3 4 5 6 7 8 9 10 11 12 13 14 15 16 17 18 19 20 21 22 23 24 25 26 27 28 29 30 31 32 33 (py38mmyolo) houjinliang@3080server:~/userdoc/offlinefile$ ll
如要查看当前目录已经使用总大小及当前目录下一级文件或文件夹各自使用的总空间大小
1 2 3 4 5 6 7 8 9 10 11 12 (py38mmyolo) houjinliang@3080server:~$ du -h --max-depth=1
新服务器配置记录 系统详细 1 2 3 Welcome to Ubuntu 18.04.6 LTS (GNU/Linux 5.4.0-150-generic x86_64) Model name: Intel(R) Xeon(R) CPU E5-2699C v4 @ 2.20GHz NVIDIA Corporation GA102 [GeForce RTX 3090] (rev a1)
个人目录 1 2 3 4 5 6 7 8 9 10 houjinliang@3090server:~$ ll
Miniconda 下载Miniconda的sh脚本文件,增加文件可执行的权限,然后执行下载脚本.
1 2 3 houjinliang@3090server:~/MyDownloadFiles$ wget -c https://repo.anaconda.com/miniconda/Miniconda3-latest-Linux-x86_64.shchmod +x Miniconda3-latest-Linux-x86_64.sh
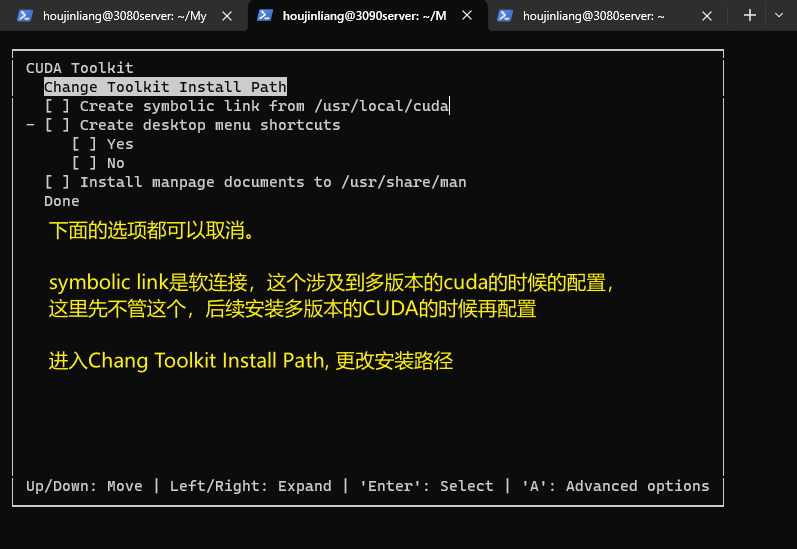
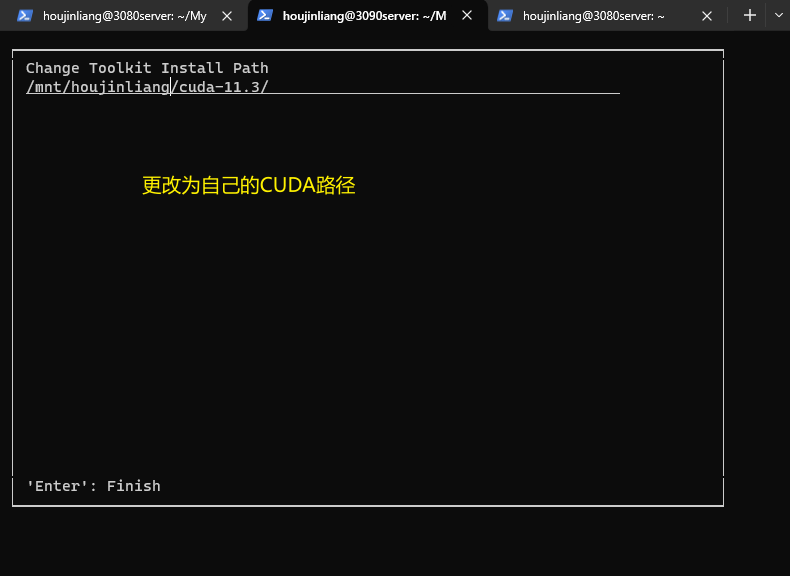
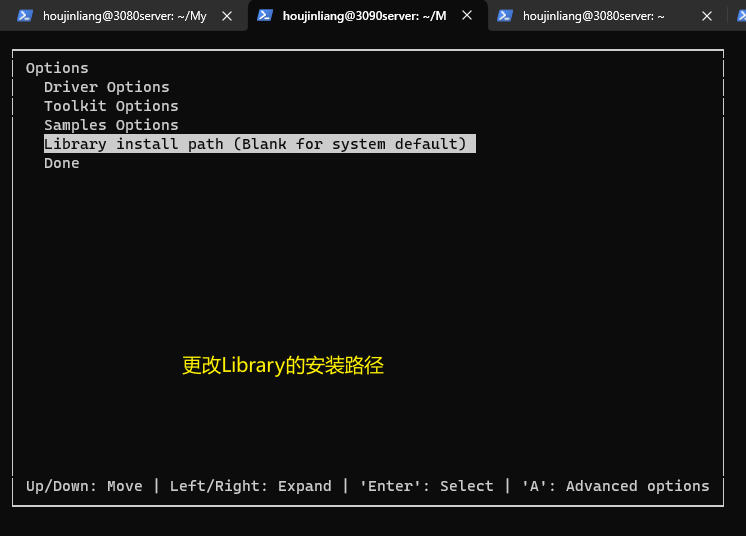
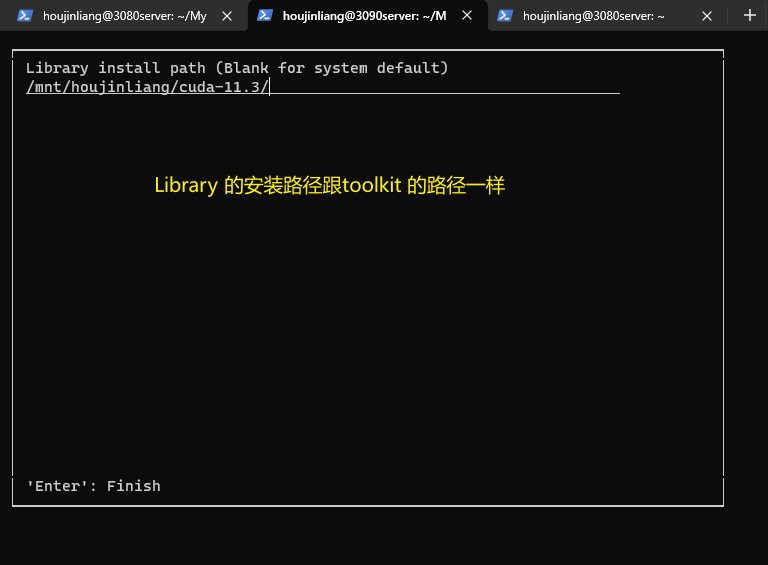
安装过程中会有选择安装路径的选择,直接选择默认路径.
1
2
3
4
5
6
7
8
9
安装完成之后conda命令在终端是识别不到的,需要配置环境变量.
1 2 3 4 5 6 7 8 9 10 11 12 13 14 15 16 17 18 19 20 21 22 23 24 "$('/mnt/houjinliang/miniconda3/bin/conda' 'shell.bash' 'hook' 2> /dev/null) " if [ $? -eq 0 ]; then eval "$__conda_setup " else if [ -f "/mnt/houjinliang/miniconda3/etc/profile.d/conda.sh" ]; then "/mnt/houjinliang/miniconda3/etc/profile.d/conda.sh" else export PATH="/mnt/houjinliang/miniconda3/bin:$PATH " fi fi unset __conda_setupsource ~/.bashrc
检查一下Minconda的基本信息.
1 2 3 4 5 6 7 8 9 10 11 12 13 14 15 16 17 18 19 20 21 22 23 24 25 26 27 28 29 30 31 32 33 34 env location : /mnt/houjinliang/miniconda3dir : /mnt/houjinliang/miniconda3/etc/conda
conda换源,换成阿里云源
1 2 3
pip换源,换成阿里云源
直接用命令的方式,如下.
1 2 (base) houjinliang@3090server:~$ pip config set global.index-url https://mirrors.aliyun.com/pypi/simple/
或者是修改 ~/.config/pip/pip.conf (没有就创建一个), 内容如下:
1 2 3 (base) houjinliang@3090server:~$ cat ~/.config/pip/pip.conf
CUDA 11.3.1 & CUDNN 8.9.5 跟之前的服务器CUDA版本一样,这里还是参照上面的进行安装.
1 2 3 4 5 6 7 8 9 10 11 12 13 14 15 16 17 18 19 20 21 22 (base) houjinliang@3090server:~/MyDownloadFiles$ wget https://developer.download.nvidia.com/compute/cuda/11.3.1/local_installers/cuda_11.3.1_465.19.01_linux.runchmod +x cuda_11.3.1_465.19.01_linux.run
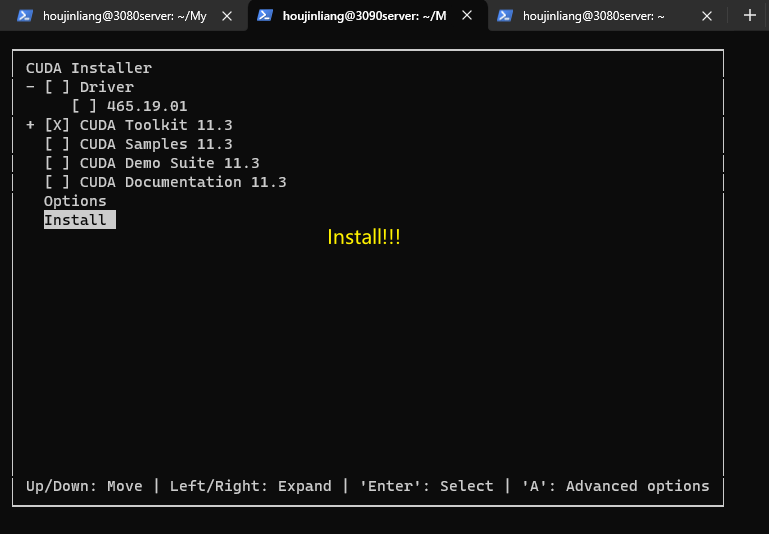
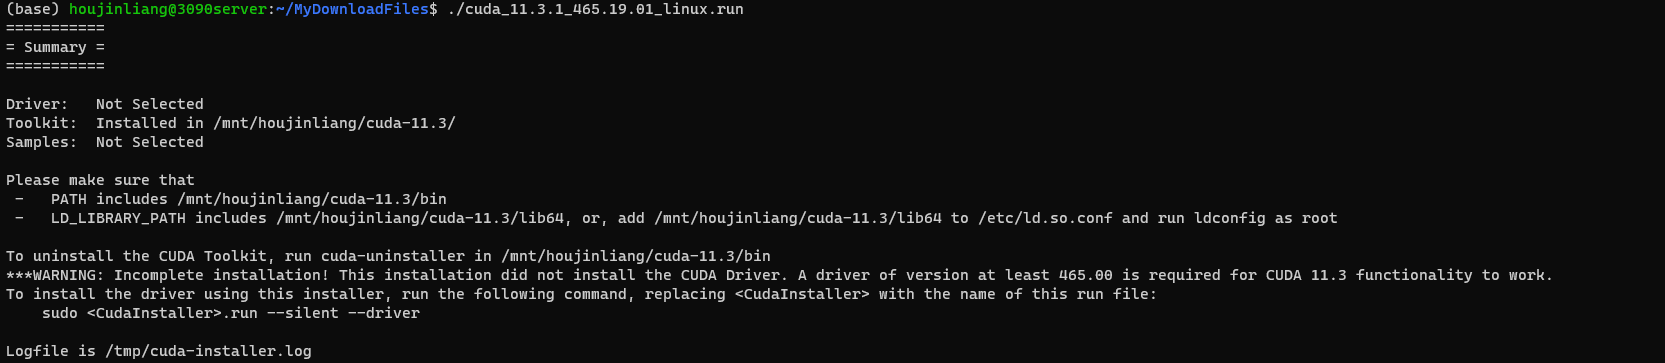
安装完成
1 2 3 4 5 6 7 8 9 10 11 12 13 14 15 16 17 18 19 (base) houjinliang@3090server:~/MyDownloadFiles$ ./cuda_11.3.1_465.19.01_linux.runin /mnt/houjinliang/cuda-11.3/in /mnt/houjinliang/cuda-11.3/binfor CUDA 11.3 functionality to work.command , replacing <CudaInstaller> with the name of this run file:
配置CUDA Toolkit 的环境变量,使用vim或vscode
1 2 3 4 5 6 7 8 9 10 11 12 13 14 15 16 17 18 19 (base) houjinliang@3090server:~$ vim ~/.bashrcexport CUDA_HOME=$CUDA_HOME :/mnt/houjinliang/cuda-11.3export PATH=$PATH :/mnt/houjinliang/cuda-11.3/binexport LD_LIBRARY_PATH=$LD_LIBRARY_PATH :/mnt/houjinliang/cuda-11.3/lib64source ~/.bashrc
cudann安装。cudnn的下载需要到nVidia的网站,登录账号才行,这里我就直接用之前安装的时候已经下载好的了。
1 2 3 4 5 6 7 8 9 10 11 12 13 14 15 16 17 18 19 20 21 22 23 24 25 26 27 28 29 30 31 32 33 34 35 36 37 38 39 40 41 42 43 44 45 46 47 48 49 50 51 52 53 54 55 56 57 58 59 60 61 62 63 64 65 66 67 68 69 70 71 72 73 74 75 76 77 78 79 80 81 82 83 84 85 86 87 88 89 90 91 (base) houjinliang@3090server:~/MyDownloadFiles$ llcd cudnn-linux-x86_64-8.9.5.29_cuda11-archive/cp lib/* ~/cuda-11.3/lib64/cp include/* ~/cuda-11.3/includechmod +x ~/cuda-11.3/include/cudnn.hchmod +x ~/cuda-11.3/lib64/libcudnn*cat ~/cuda-11.3/include/cudnn_version.h | grep CUDNN_MAJOR -A 2
Git & Github 1 2 3 4 5 6 7 8 9 10 (base) houjinliang@3090server:~$ git config --global user.name 'hjl_3090server' 'cosmicdustycn@outlook.com' "cosmicdustycn@outlook.com" in which to save the key (/mnt/houjinliang/.ssh/id_rsa):'/mnt/houjinliang/.ssh' .for no passphrase):in /mnt/houjinliang/.ssh/id_rsa.in /mnt/houjinliang/.ssh/id_rsa.pub.
1 2 3 4 5 6 7 8 (base) houjinliang@3090server:~/.ssh$ pwd
1 2 3 4 5 6 7 8 9 10 (base) houjinliang@3090server:~$ git config user.name'github.com (20.205.243.166)' can't be established. ECDSA key fingerprint is xxxxxxxxxxxxxxxxxxxxxxxxxxxxxxxxxxxx Are you sure you want to continue connecting (yes/no)? yes Warning: Permanently added ' github.com,20.205.243.166' (ECDSA) to the list of known hosts. Hi murphyhoucn! You' ve successfully authenticated, but GitHub does not provide shell access.